2013年1月31日 星期四

The Improvements - Bruder CAT Excavator RC Conversion Project

After completing the conversion, I enjoyed playing with it all the time and shared with others as well.  However, due to very rough machining or fabrication, some of the components did not perform what they normally do.  I have made some improvements as follows:

1.   The Antenna
The original antenna is a wire connected to the receiver box and a plastic tube is provided to support it.  It was very difficult to store it when unused.  I replaced it with a retractable antenna which can be conveniently pulled out and retracted.


2. The Fuse
The Vexplorer transmitter and receiver kit used to control the machine worked very well until some time ago I smell something coming from the receiver box.  I didn’t know what happened and opened it.  Two tiny parts were burnt out and therefore two channels were not functioning.  I believe that it was caused by the surge current of stall motors.  As there is no way to order the receiver box alone, I have to order the whole kit which is a waste of money.

To avoid the new receiver burnt out again, I installed a fuse in the power supply circuit which was next to the battery box for easy replacement.  The size of the fuse is 1A as it should be well enough for 3 motors running at the same time.


3. The Head Lamps
 Two LED lights are installed at the roof of the cab to stimulate the real machine.


4.   The Cylinders
The cylinders converted from the original plastic components were not strong enough.  To save the issue, I fabricated the cylinder body from aluminum tubes.  The section housing the micro motor and gear box is a 16 x 14 mm; remaining cylinder is 14 x 8mm.  The cylinder rod is 8mm x 6mm of which the screwed shaft is turning inside.  A small flat bearing is put in the driving shaft to provide a smooth turning.  Two grub screws, one in each side of the cylinder are used to stop the turning of the motor inside the cylinder.

It took me a few days of spare time for making one cylinder.  If it runs smoothly, I will modify the remaining boom, stick and bucket cylinders.


2013年1月23日 星期三

The Complete Machine - Bruder CAT Excavator RC Conversion


It took me almost 5 months of spare time to complete the conversion; most of the times were spent to search the internet for different solutions, ordering the parts and waiting for the shipment.  I reckoned that I have spent only 1/3 of the time actually doing the conversion.
 
After completing the conversion, I feel satisfactory and lost.  The conversion was followed in what I planned and designed.  There were some hiccups including the lost shipment of the mini slip ring and wrong order of some components.  I feel lost because I need to find another project to do, in addition to cycling. 
 
The Model   US$52.00
The Travel System   US$72.00
The Slewing Turntable    US$46.00
The Cylinders     US$85.70
The RC System US$54.98
 
Total Costs   US$310.68 + shipping
 
As I could not find any suppliers of above materials and parts in my country, I had to order all of them in the net, primarily from on-line shops in US (Robot Market Place).  The shipping cost is expensive and I reckon it was about 30 – 40% of the costs, approximately US$100.  In addition, I needed to order some materials or components as a pack even-though I used only a few pieces of them. 
 
I made an estimate that I have spent almost US$500 on this project.  I might save some shipping cost if I ordered the parts and materials one order.  To order most of the above-listed parts and materials, I would recommend Robot Market Place (http://www.robotmarketplace.com).  They provided very good service and prompt delivery.

I later found out that there are similar micro geared motors and mini slip rings available in China at a fraction of the cost.  I presume that they are coming from the same manufacturer.  I am seraching in the internet for more supplies and believe that I can reduce the total costs by as much as 25 - 50%.


2013年1月13日 星期日

The RC System - Bruder CAT Excavator RC Conversion Project

I admit that I am not a RC enthusiast and know nothing about radio control system.  I only understand that I require a 6-channel RC system to control the travelling, slewing and cylinders movement.  There are large number RC systems available in the market but mainly for remote control of airplane or speed boat models.  The 5th and 6th channels normally are switches.
 
After searching the market, I finally decided to purchase the VEXplorer Transmitter + Receiver Kit.  It is a less expensive and simple RC system.  It consists of a transmitter with 2 joysticks for 4 channels of control and 2 on-off push-button controls, one receiver for 6-channels with 2 auxiliary powers, and a battery holder.
 
It is a plug-n-play kit and there is no calibration or adjustment required.  You simply insert the VEX 2-pins plugs into the slots of the receiver and change the polarity of the power by flipping over the plug.


Step 1
Connect the motors with 2-pins wires, secure the receiver on the floor inside the excavator model, and inserts the plugs in the slots. Change the polarity of the wires by flipping the plugs if required.


Step 2
As you would not want to dismantle the body of the excavator model every-time you change the batteries, cut out the space under the engine hoop and put the battery holder inside and connect it with the receiver.


Step 3
Stick the control pattern diagram on the transmitter for guidance of controlling the excavator model.
 
 
Now you have a complete RC system to control an excavator model. Two sets of on-off push buttons on the top of the transmitter for controlling the forward and backward travel of the two crawlers. Two joy-stick control levers for 4-channels of control. Left joy-stick left-n-right for slewing, and up-n-down for stick in and out. Right joy-stick left-n-right for bucket in and out, up-n-down for boom lower-n-raise.
 
Parts used are:
1 x VEXplorer Transmitter & Receiver Kit US$39.99
6 x VEX 2-wire Cable US$14.99
 
Total cost: US$54.98 + shipping

2013年1月11日 星期五

The Cylinders - Bruder CAT Excavator RC Conversion

There are basically two types of cylinder, hydraulic or electric.  With hydraulic, you would require a motor driven hydraulic pump and distribution valve set to provide and control oil flow.  It is more complicated, expensive and suitable for metal models.  You would not able to make them for yourself without a CNC machining lathe but can be purchased from suppliers such as Manolo Gomez.
 
On the other hand, the electric type is easier to handle and you can make them for yourself using hand tools. One example is to use the hand drill bit driven by a motor with the nut fixed inside the tube. When the shaft is turning, the tube will slide in and out of the cylinder simulating the linear action.  You can also purchase them from supplier such as CTI-Modellbau.
 
After considering different options, I decided to go for electric type and make by myself using the original plastic cylinders as the body.  From the information of various conversion projects or part suppliers, I understand that the linear speed and stroke of the cylinders as below:
 
Liner speed: 10mm/s
Stroke:  40mm for bucket, 80mm for stick and 70mm for boom
 
A M4 threaded shaft is used as the driving shaft which is turning in a M4 stand-off to cause the cylinder rod moving in a linear direction.  Every turn of the shaft will cause the stand-off to move 0.7mm.  Therefore, you would need a motor of 900rpm to achieve a 10mm/s speed.
 
Step 1:
The geared motor has a 10 x 12mm cross-section area. You would need to round off the edge enabling the motor to be fixed inside the original cylinder body of 10mm diameter.


Step 2
Cut the threaded shaft to appropriate length and connected to the motor via a light hub.  The light hub is made of plastic material with copper collar for set-screw.  The tube of the light hub is accommodated for M3 but there is no problem to screw the M4 shaft into it, providing enough strength to hold the shaft. The shaft end is fixed with a screw nut as stopper.


Step 3
The M4 stand-off is fixed to the tube of the rod, you would need to grind-off a little bit of the edges.  Then put the cylinder body and rod together.  Fix the motor with plastic straps into position.


Step 4
Connect the motor with power to see if the rod slides in and out of the cylinder smoothly.


I admit that this is not a good looking option for such modification.  However, if you do not want to spend money on expensive electric linear cylinders, it is the easier and economical way to achieve with only hand tools.
 
Parts used are:
4 x FingerTech geared motor US$63.80
2 x 300mm M4 threaded shaft   US$8.00
4 x M4 stand-off US$3.00
4 x screw nut   US$1.00
4 x FingerTech light hub US$9.90
 
Total cost: US$85.70 + shipping

2013年1月9日 星期三

The Slewing Turntable - Bruder CAT Excavator RC Conversion Project – The Slewing Turntable

The slewing turntable allows the upper structure to rotate freely.  In a real machine, you would have a large ring slewing gear with roller bearings, rotated by a hydraulic slewing motor and distributor to provide hydraulic oil to drive the travel motors.
 
In most of the conversion projects, metal ring bearing is used to provide a smooth rotation.  Whereas, a large ring gear is bolted on the frame and driven by a motor with a pinion gear.  The rotation speed is determined by the rotation speed of the motor and gear ration between the ring and pinion gears.  In a real machine, the slewing speed is approx. 10rpm. With a gear ration of 10 times, you would require a motor with speed of 100rpm.
 
In scale models, some ready-to-play RC models only allowed rotating of 360 or 720 degree.  The reason is the wires providing electric power to the travel motors will twist and strangle together after turning a few times.  To solve this issue, you can use a mini slip ring which is generally used in the security CCTV to provide continuous power supply.  It comes with 6-12-24 wires with 2A rated current.  You can easily purchase it in the eBay but it is normally for wholesales as the shipping charge is not worthwhile to purchase only one unit. In addition, you can purchase through a number of suppliers such as Robotshop and Adafruit at US$17.5 + shipping.
 
It later turned out to be missing during the shipment and another one was ordered causing delay of the project for 2 weeks.


For the slewing gear and bearing, after searching the internet for suitable components and ways of modification, I decided to purchase a VEX turntable bearing kit with motor.  VEX (Vexrobotics) is famous for supplying robot components for leisure, education and competition.  Their products are pricey but well accepted by the robotic fields. 
 
 
The turntable and motor are ordered through Robot Market Place together with other components.  The turntable is prices at US$19.99 + shipping and the motor at US$12.99 + shipping.  The pack comes with two turntables, one 4.25” dia. and one 2.6” dia.  The larger one has provision to install the motor so that we do not need to worry about the alignment of the motor and the gear.


The larger turntable proves to be too large and the smaller one is a good fit.  The turntable, driving motor and gear are fitted on a single PCB to provide the necessary alignment and rigidity.  It was then connected to power and found out to be running smoothly.  According to the gear ratio, the maximum slewing is to be 20rpm.


Parts used are:
1 x VEX turntable (60T)   US$8.00 (used only the smaller one)
1 x VEX motor type 269 US$12.99
1 x 12T pinion gear US$1.66
1 x bearing flat    US$0.50
1 x shaft collar    US$0.65
1 x 2” square shaft US$0.60
4 x 10mm stand-off US$4.00
1 x mini slip ring US$17.50

2013年1月6日 星期日

The Travel System - Bruder CAT Excavator RC Conversion Project

Most of the conversion projects are using electric geared motors or servo motors to drive the excavator.  The simple one is to bolt the motors on the travel frame and connected to the driving shaft.  As the motors are installed outside of the frame, it is easier to be damaged and looking not so pretty.  Another option is to install inside motors inside the frame similar to what the CTI-Modellabu’s kit with pulley-belt system.

Before ordering the parts and components, you would require to determine the size of the motors required.  Normally, a real excavator travels at max. 5.5 km/h or 90 m/min.  With a scale of 16:1, you would require the model to travel at least 5.6 m/min.  As the diameter of the driving wheel is approx. 4 cm, each revolution of the wheel is equivalent to 12.5 cm of travel.  It will require the motor to have at least 45 rpm to achieve 5.6/min. speed.

Then, we need to decide the power output of the motors.  By pulling the model, the friction coefficient is found out to be approx. 25%.  With weight of the model and other components added up to be around 2 kg, you would require to have a pulling force of at least 0.5kg in order to enable the model starting to move.  To ensure the excavator model traveling at top speed, I added a factor of 100% which turns to be 1.0kg in total or 0.5kg per motor.  Therefore, you would require motors with torque of 9.3N.cm.

I decided to adopt the pulley-belt system and taking the above as consideration, the following parts were ordered from Robot Market Place, where you can use your calculator to determine the belt length, gear ratio and pulley sizes:

2 x 30T pulleys
2 x 15T pulleys
2 x 67T belts
2 x 150:1 micro geared motors
2 x motor mounting brackets
Total cost: US$72 + shipping


Robot Market Place website:


Step 1
You would need to cut out spaces at the undercarriage structure to house the motors, pulleys and belts.  After cutting out the space, the bracket that allowing the drive shaft becomes weaker and an extra support bracket is required.

Step 2
The original shaft is only an aluminum pin, it is then replaced by a stronger 4mm bolt.  The larger pulleys are machining at the edge to reduce the O.D. in order not to interfere with the travel frame and the bore is enlarged to 4mm dia.  The pulley is fixed by a set-screw to fix at the shaft and bolt is screwing into the sprocket wheel.

The driving motor is fixed by a T-shaped mounting block of which is bolt on the undercarriage structure.  You might need to use shims to adjust the height and position of the mounting bracket so as to achieve the necessary tension of the belt.


 Step 3
By putting together the travel frame and tracks, the motors are connected with a power supply of 6V to test the driving speed and other functionality. 


http://youtu.be/GLgdPl3Pb4Q
During the assembly, it found out that the larger pulley could not fit in the travel motor hub.  It is better to a smaller pulley (26T) and shorter belt (64T) in the future.  Furthermore, if you can find a slower motor, it is better to order two small pulleys so that you do not need to cut out so much space of the undercarriage frame to accommodate the pulley-belt system.

2013年1月3日 星期四

The Model - Bruder CAT Excavator RC Conversion Project

As working in the construction equipment industry, it is natural that you would be interested in real machine or scale model.  A couple years ago, I was fascinated by a scale excavator model operating like a real one.  It found out to be a Wedico 1:14.5 scale 345DLME with hydraulic system and remote control.  It costs more than US$6,500. 

Wedico Website: http://www.wedico.de/eng/


And then after searching the market and internet, it found out to be basically three types of remote control scale excavators available:

1. Hobby Grade Scale RC Excavators – like the Wedico 345DLME, they are made of aluminum metal with scale from 1:12 to 1:15 and weight at around 10 kg or over.  Due to its weight and required digging force, the cylinders are powered by hydraulic system, whereas the travel and slewing are electric. Price range from US$3,000 – US$6,800.  Other suppliers are including EC280MG from Minetwice, Italy, Liebherr 922 from Stahl Modellbau, Germany, 4000XL from RC4WD, etc.


2.
Toy Grade Scale RC Excavators - there are a number of these toys available in the market, with scale from 1:50 to 1:16.  It typically costs from US$100 to $400.  They are made of plastic materials with boom, stick and bucket lifting mainly operated by gears.  For example, Hobby Engine model 803 and 703, Kyosho’s Komatsu PC1250, Artic Land Rider 507, etc.  There are number smaller toys available which are suitable for only kids.


3. Self-fabrication or Conversion – you can make it starting from scratch by cutting the shapes from aluminum sheet metal and weld them together.  However, you would require certain level of skills to do that and it may take months or not years to complete.  In recent years, there are more people using scale models to convert them into remote control.  The typical excavator model used by most of the people is the Bruder CAT Excavator.  Basically for the conversion, the travel system is mainly electric-driven as well as the slewing turntable connecting the undercarriage and upper structure.  The boom, stick and bucket cylinders are driven by hydraulic, electric or pneumatic.  Due to its weight, the metal models are mainly driven by hydraulic and the plastic models by electric. 

There are a number of hobby kit suppliers in the market producing components or kits for you.  If you do not have time, some suppliers will do the conversion for you, e.g. Manolo Gomez at around US$900 + shipping and they also supply the hydraulic kit for CAT excavator model at around US$350 + shipping. CTI-Modellbau, Germany produces all the necessary kits for CAT excavator model.  For example, the travel system is at around US$130, turntable at US$140 and the electric-driven boom, stick and bucket cylinder at around US$80 per piece.

After considering several options, I decided to go for the conversion.  The Bruder Cat Excavator Model is available in most of the on-line toy shops, eBay and Amazon.  After comparing the price and shipping charge, I finally ordered model from Amazon at US$52 + shipping.   


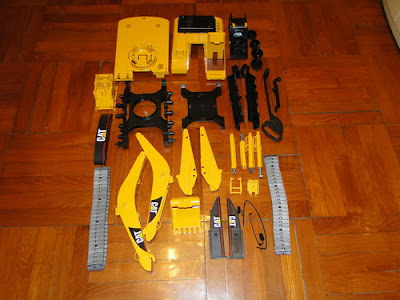
The Bruder CAT Excavator model is finely made out of high quality plastic materials with a lot of small details close to the real machine.  It uses “clicks” rather than screws to assemble the models and not meant to be dismantled again.  It took me almost an hour to figure out how and another one hour to   dismantle the model into pieces with some forces. 
To convert a static excavator model to remote control, you would require considering the following four areas:
1. Travel system
2. Slewing turntable
3. Boom, stick and bucket cylinders
4. Radio remote control system